Recording and Mixing Jazz Guitar
Dec 20, 2017Getting The Most Out of Your Recording Session, For Jazz Guitarists
Guest post by Jared
Mixing for Jazz Guitar: How-To
- Silence the noise
- Set the Volumes & Panning
- Equalization Brings Clarity
- Compression Brings Consistency
- Use Sound Effects to Liven Up the Mix
Like most of us, when it comes to the guitar you’ve likely spent more time learning to play it than anything else. Any time away from that core focus is devoted to studying music theory, advanced picking and fingering techniques, and learning to set up our axes and be our own technicians. The activities that usually get pushed to the back burner are recording and mixing.
Be it due to time restraints or a hesitation to create evidence that our songs exist (hey, who isn’t timid about sharing their original music?), recording and mixing seem to never become a priority. It can feel like a big hill to climb with a steep learning curve. And we also have to spend money on software and hardware to even get started. Let’s be honest, most of us just pull out our smart phones and record on them.
That’s fine and dandy if you’re just taking notes of a melody you want to remember or cutting a quick demo to send to a friend. But what about when it’s time to get serious about producing your first real album? I’m going to give you an overview of the topic so you understand what gear you should be considering and deliver you a guide to walk you through the broad steps towards polishing your recordings.
The Gear You’ll Need
There are a few non-negotiables you’ll have to have before you can press record. You’ll obviously need a computer that’s capable of running a DAW, or digital audio workstation, that has a multi-track layout. Even if you don’t know what a DAW is, you’ve likely heard of them, such as Logic Pro, Pro Tools, FL Studio, Ableton Live, etc. You can even get away with a free version such as GarageBand, although you may be restricted in the sound fonts and plugins to which you’ll have access. The discussion from this point forward assumes you can learn to navigate this software well enough to record tracks and apply plugins to those tracks.
The next piece of the puzzle to concern yourself with is how you’ll transport the sounds from your guitar into your computer. There are two ways of doing this. You’ll either use a direct injection (D.I.) input or a microphone. Neither are better or worse, but for a beginner recording engineer that’s recording an electric guitar or acoustic-electric guitar I’d recommend a direct injection.
The reason a D.I. input is preferable is that your room is a very impure acoustic environment. If you haven’t invested heavily into acoustic treatment panels (not foam!), then your results are going to sound muddy and blurry. That’s due to the increased bass response and reflections bouncing all around the room. Skipping a microphone and plugging straight into a high impedance input lets you dodge these issues altogether. But if you’re going to record vocals as well then you can’t escape it.
If you’re recording an acoustic guitar or classical guitar without any type of pickup or an electric through an amplifier you’ll have to use a microphone. I always recommend a large diaphragm condenser mic for acoustic guitar due to their increased sensitivity over a dynamic microphone and their typically brighter frequency response.
There are condenser mics with a darker coloration though, so make sure you’re paying attention to what you buy or use. You may consider a dynamic mic if you’re miking an amplifier since they can withstand higher sound pressure levels without sustaining damage. If you can borrow or rent several mics to experiment with, you may find that you like a darker sound, but that’s something you can achieve while mixing too.
The final piece of equipment that ties it all together is the audio interface. This item is akin to an external sound card that takes all of the analog inputs and digitizes them so your computer can understand them. Nearly every interface will come with at least one input that features two ways of plugging into it. You can use an XLR cable from the microphone which will route the signal through the preamplifier. Every microphone signal must use a preamp to boost the levels up to line-level. The best preamps will do this without boosting the noise floor and without affecting the quality of the signal. No microphone will show its true potential without a great preamp, but the ones in your interface will take you a long way without requiring you to spend extra money.
The same inputs that take the XLR cable will have a method to accept a TRS or TS cable as well, which will bypass the preamp. This is so you can use instrument-level signals like your guitar outputs instead of only mic-level signals. This is how you direct inject the signal if you have an electric guitar. If you choose to route through effects pedals or a modeling amp first, you will still use these D.I. inputs, although I recommend not using any effects on the way in. That’s because there’s no undo button at that point, whereas you can apply effects “in the box” while mixing with complete recall of previous settings.
Recording Guitar with a Microphone
If you’re direct injecting then all you need to do is set the gain on your guitar or pedals until you’re in the sweet spot inside the DAW software (you want to be coming in at -18dB, which gives you the highest resolution without clipping in the analog hardware). The process is the same with a microphone except you’ll work with the gain knob of the preamplifier to set the proper levels.
What you have to take into account with a mic that you don’t have to worry about with a direct input are factors such as the distance of the microphone from the sound source, where it should be aimed at on the sound source, and unwanted noises creeping into the recording. This goes for recording the guitar itself or the guitar by-proxy through an amplifier.
You will, without a doubt, want to employ the technique of close miking whether recording your amp or your guitar, because this will boost the signal-to-noise ratio drastically. You’ll get more of the sound you want and less reverb bouncing around the room and less sounds like your computer’s fan or your air conditioner. The best distance of the mic from the sound source for close miking is between 6 inches to 12 inches. You’ll want to try various distances in that range to see how they sound, but you’ll want to stay within those bounds for the best results.
If you have access to only one microphone, you’ll want to aim it between the 12th and 14th fret of the guitar’s neck, turning it slightly either direction until you find the sweet spot that sounds best to you. If you have access to a second microphone you can aim it below the sound hole towards the bridge and even past it to introduce more bass. Having these two options allows you to mix them together to taste later. If you’re recording an amplifier, aim it at the woofer and then turn it slightly off-axis to deflect any spikes in amplitude. Turning it away keeps you from recording any loud pops. This works great for vocals as well.
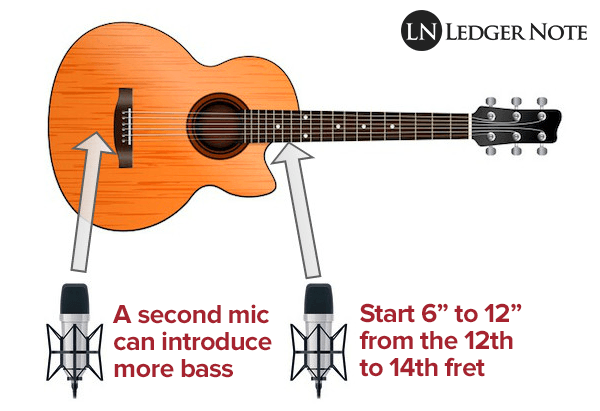
There are a lot of other ways to position and orient two microphones, but the above method is tried and true. It’s the easiest to get good results, while the others are easy to make mistakes with. If you want to explore them, look up concepts such as the Blumlein Configuration, an X-Y stereo pair, a Side-Other-Side setup, a Close & Room setup, and others. The above Horizontal Pair method will likely remain your preferred tactic.
Mixing Your Guitar Tracks
Now that you’ve recorded all of your takes onto various tracks on the multi-track, it’s time to clean each of those tracks up so that they sound good in isolation and then to balance them within the stereo field so they sound great with regards to each other. This is the act of mixing.
If you recorded vocals and other instruments or set up MIDI backing tracks, the process is the same for them as well. You’ll just need to extrapolate the logic used while thinking about how to approach each sound. Mixing is a science, but even more so it is still an art form, so you can’t simply follow a procedure. You’ll have to think creatively.
Silence the Noise
Your first goal is to clean up each track, meaning we want to clean up any unwanted noises. Usually we leave some lead-in time where we count ourselves in before beginning to play our instrument or sing that we’ll want to silence. The same goes for at the ends of the tracks or during parts of the song where our instruments drop out momentarily.
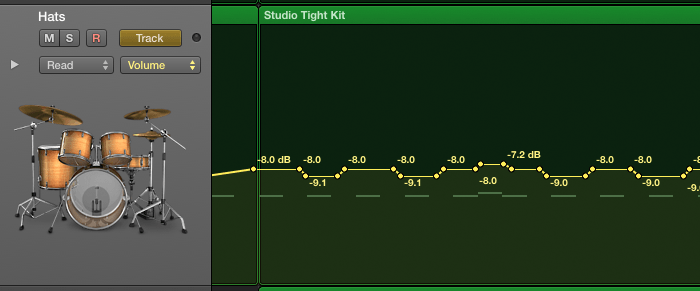
You’ll want to silence those sections so unwanted noises aren’t playing quietly in the background. It may not be noticeable as much on one single track, but when you add 10 to 30 tracks together it’ll be very obvious. You can use volume automation to automatically control the volume faders or the gain knob on a gain plugin to mute the unwanted sections, or you can use a noise gate plugin. If you’re not experienced with a noise gate, make sure to listen back as it’s easy to mess up and clip off the sustain of your notes. Always take extra care with a noise gate!
Set the Volumes & Panning
The next part is quick and isn’t one to antagonize over getting perfect because we’ll be constantly disrupting the work we do at this point anyways. The first thing to do is label each track of the multi-track so you can identify them visually, then drop the volume faders to negative infinity. Then start bringing each track up in volume, starting with the lead, and then backing tracks and other instrumentation. Your goal is to set the loudness of each track in relation to each other so they’re playing close to the volume you envision them being once the song is finalized.
Once you get the volumes balanced, you’ll pan specific tracks some distance to the left or right. While this is largely up to you to choose creatively, there are some conventions you shouldn’t break. For instance, the lead instrument, lead vocals, snare drum, kick drum, and bass guitar or synth should always stay centered. Rhythm tracks, backing vocals, and other drums can be spread out, but try to maintain some sense of symmetry.
Equalization Brings Clarity
At this point, your mix is starting to resemble a real song, but it sounds a little muddy and cruddy. You probably think that the guitars are clashing together and are fighting for space with the vocals. Equalization, or EQ, is the tool to solve this problem.
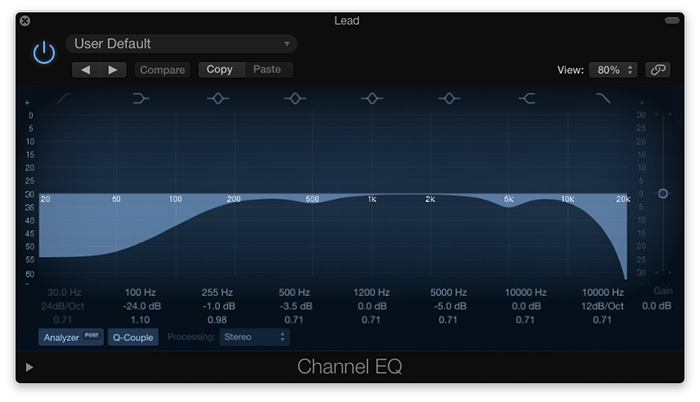
EQ allows you to alter the frequency response of each track so you can carve out a space for each instrument in the song. For example, if the prominent frequency range for the lead vocals are 2kHz to 5kHz, you may consider cutting some volume in the guitars in that range, if only slightly.
Another example is when you have drums and bass in your song. They have no business having high frequencies in them that are getting in the way of the guitar, and your guitar has no need to be using sub-bass or even much volume in the bass frequencies. So by removing those frequency ranges partially or entirely from those relative tracks, you make room for each of them so they can be heard more clearly by the listener.
The EQ discussion can go on forever and represents the bulk of the mixing work you’ll do. This is something you’ll have to think about and practice over and over, but follow the logic above and apply it to each scenario you face and you’ll improve your songs ten-fold.
Compression Brings Consistency
Now that your volumes are set, sounds panned, and every track sounding off clearly without clashing with the next, you may notice that your song still isn’t quite there yet. You’re missing compression!
Compression is a tool that reduces the range of variance in volumes on each track. It takes the loudest parts of a track and makes them quieter so that the gap between the softest part and loudest part is less than it was. Reducing this variance keeps the volumes from wavering up and down too much, which makes it harder for the listener to grasp on to what they’re hearing.
Without fail, you will want to compress every track, and more than you think. There’s a temptation among us to remain purists and not use compression (not sure why, we’re all happy to use other effects), but we’re not doing ourselves or our listeners any favors when we avoid this effect. You’ll want to compress each track by itself and then perhaps each as a group on an auxiliary track to help “glue” them together.
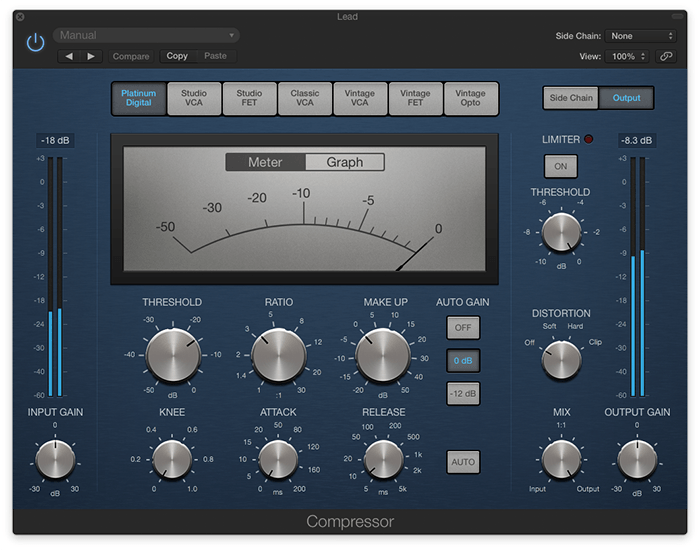
Compression has two main settings, called threshold and ratio. The threshold is a setting in decibels where any time your track becomes louder than that setting, it is reduced in volume. The amount the volume is reduced by is controlled by the ratio. Pretend you have a threshold set at -15dB with a ratio of 5:1. This means that for every 5dB the track goes over the threshold, only 1dB will come out the other side. So if your track spikes up to -5dB, you’ve gone 10dB over the threshold and that portion will be reduced down to 2dB in volume, peaking out at -13dB instead of -5dB.
There are two more settings on a compressor that are easy to understand, which are the attack and the release. The attack lets you control how quickly, in milliseconds, the compressor begins compressing after your track surpasses the threshold. The release, also in milliseconds, lets you control how quickly it stops compressing once your track dips below the threshold again.
While each setting is simple to understand, using all four together is an art form. There is no one, proper way to set up your compressor. Each track will have differing demands. All you can do is listen with your ears and practice until it becomes second nature.
Use Sound Effects to Liven Up the Mix
The last thing you’ll want to do is add your delays, reverbs, flangers, choruses, and other effects you like using. This requires little explanation since we all have done this a million times with our effects pedals. Let me just give you some tips instead.
Each of these effects is very demanding on your computer. There are ways to reduce this demand. For instance, if you’re going to apply the same reverb to 10 tracks you shouldn’t do it individually. You should route each track to a single bus where you can apply the reverb plugin once. Since each track is moving through that bus, they’ll each receive the reverb and affect when the reverb sounds off. The secondary benefit to doing it this way is you can then mix the bus as another track, applying equalization to the effects if you wish (you should).
A fatal mistake we all make in this phase is the desire to either make the tracks too wet or too dry (usually too wet). Wetness refers to how loud the effects are compared to the tracks they’re applied to, and we tend to make them too loud. You should always use the rule of thumb where you set the volumes of the effects where you think they should be, then back off at least 2 or 3dB.
If your mix is sparse with few instruments, consider using stereo effects so they spread out across the sound stage. If your mix has a lot going on, consider using mono effects that are panned at the same distance as their tracks. Beyond these three tips, it’s an art form so get creative and have fun with it!
Conclusion
The above discussion acts as a guide to the gear you need to start recording, and a step-by- step overview of how to mix your jazz guitar compositions. The mixing overview above represents a general workflow. The process should always be performed in that order with those major steps always coming one after another. It’s what you do within the steps that will define your personal style and affect how your final result turns out.
If you’re not happy with the result, it’s no surprise since mixing is a very complicated procedure. Mixing engineers exist as masters of their own art form for a reason, having practiced as much and as long as you have with your picking and music theory. You may not start out with fantastic mixes, and you may never achieve the quality of the top professionals, but you will without a doubt become good enough to write, record, and mix your own songs to such a degree that the average listener will be very impressed. Just keep practicing!


