
Improve Your Comping With Essential Tones - Easy Jazz Guitar Chords
Jul 30, 2020A Guest Post by Nathan Corr
Hello everyone! In today's lesson, I'll be showing you how to improve your comping with a concept called essential tones.
This concept was first used by pianists like Bill Evans, and later adopted for guitar by the likes of Lenny Breau and Ed Bickert.
Learning essential tones will greatly improve your knowledge of the fretboard, as well as give you the ability to add extensions like 9ths, 11th, and 13ths without memorizing hundreds of chord voicings.
Let's get into it!
Download your "Improve Your Comping with Essential Tones"
Join our Community here.
Simply put, essential tones are the heart of any chord.
They are the minimum amount of information our brain needs to recognize to decipher the quality of any chord (for example, hearing a major 7th interval versus hearing a minor 7th interval).
In jazz, we're typically dealing with seventh chords, which involve some kind of 1 3 5 and 7. Here, the essential tones are the 3rd and the 7th - you can actually get away with playing only these two notes, rather than the full voicing.
Another name you may have heard for these tones is "guide tones", or Marc's favorite term shell voicings.
Getting Started
The easiest way to get started playing essential tones on guitar is to take it one chord quality at a time.
This lesson will only cover dominant 7ths plus some alterations, but we may cover other chord qualities in a future video.
First, we have to learn how to see the essential tones, usually in relation to the root of the chord. Luckily, on guitar, this is quite simple.
Essential Tones on Blues
Let's comp through a simple blues using shell voicings, which you're probably familiar with. If not, don't worry - there are only two different shapes, and you can learn them from the PDF (download below).
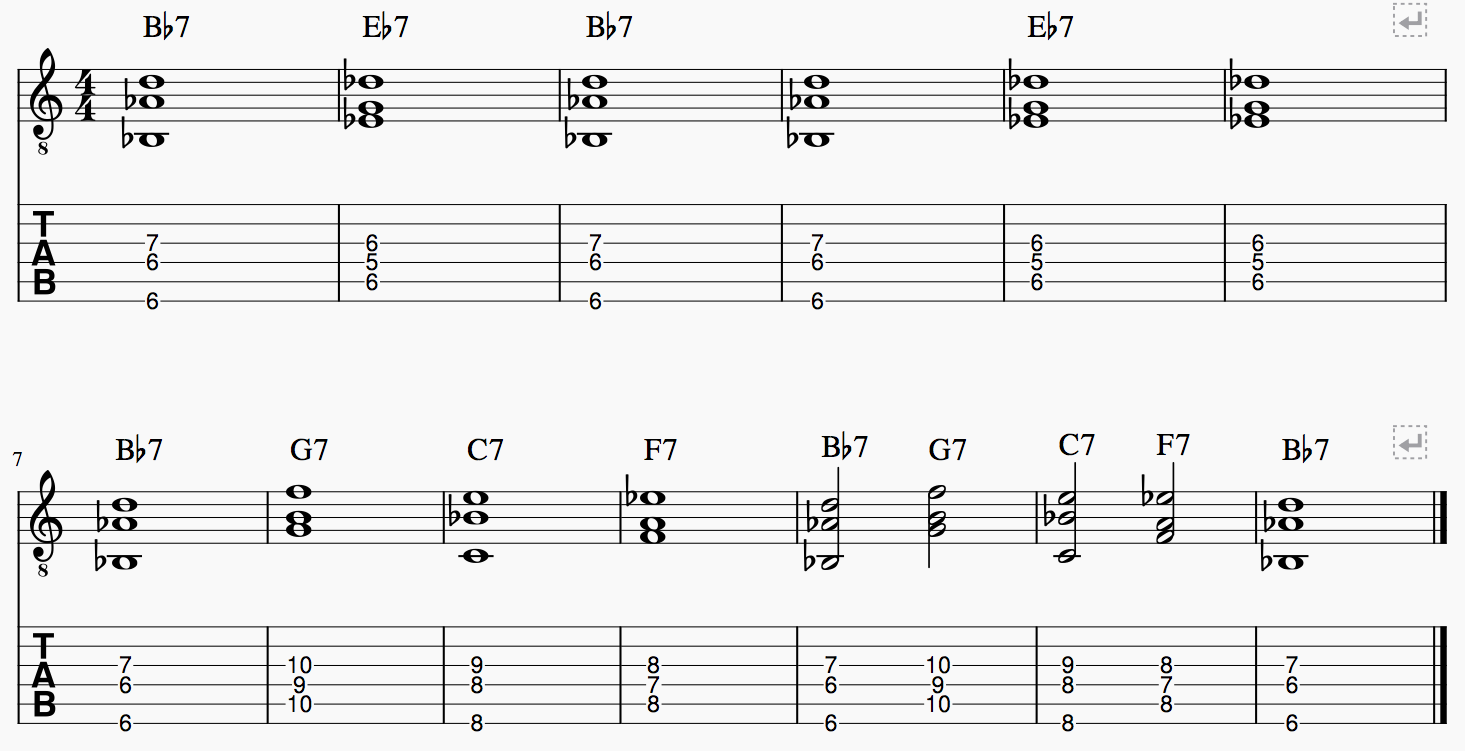
Okay, so why did we do this? Well, it turns out that the essential tones in this example are always on the third and fourth strings.
This makes it really easy to visualize each set of essential tones in relation to each root, which is always the bass note in this case.
If you can't see it confidently yet, try playing the bass note first, then the essential tones. In other words, play the "root" first, the first degree of the scale, then play the 3rd and the 7th on strings 3 and 4, like this:
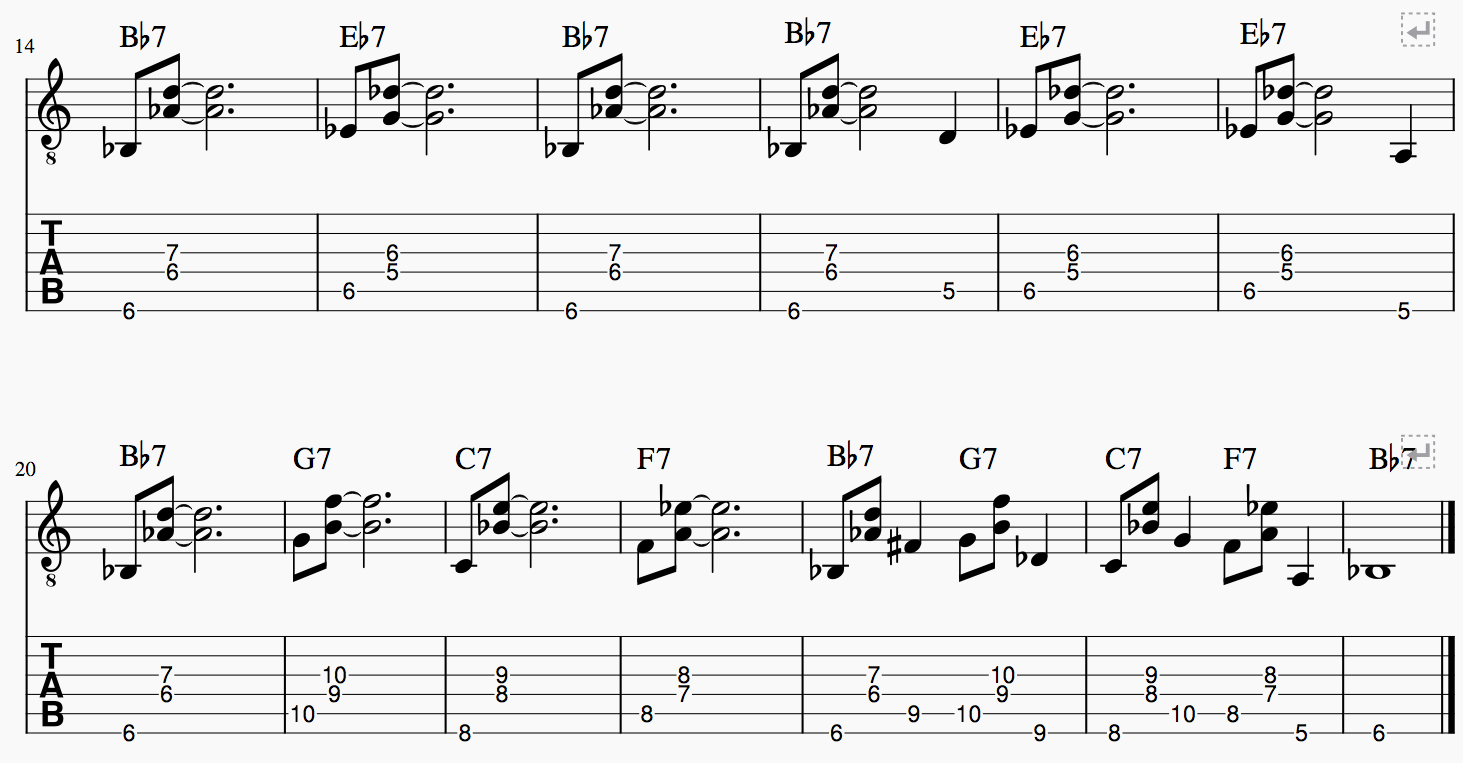
Rootless Essential Tones Blues Comping
Now let's try comping through a chorus with only essential tones - meaning, we're going to leave out the bass note. Notice how this all happens on the "internal strings" on the guitar, which are the D and G strings.
Feel free to ad lib the rhythms to make it more interesting!
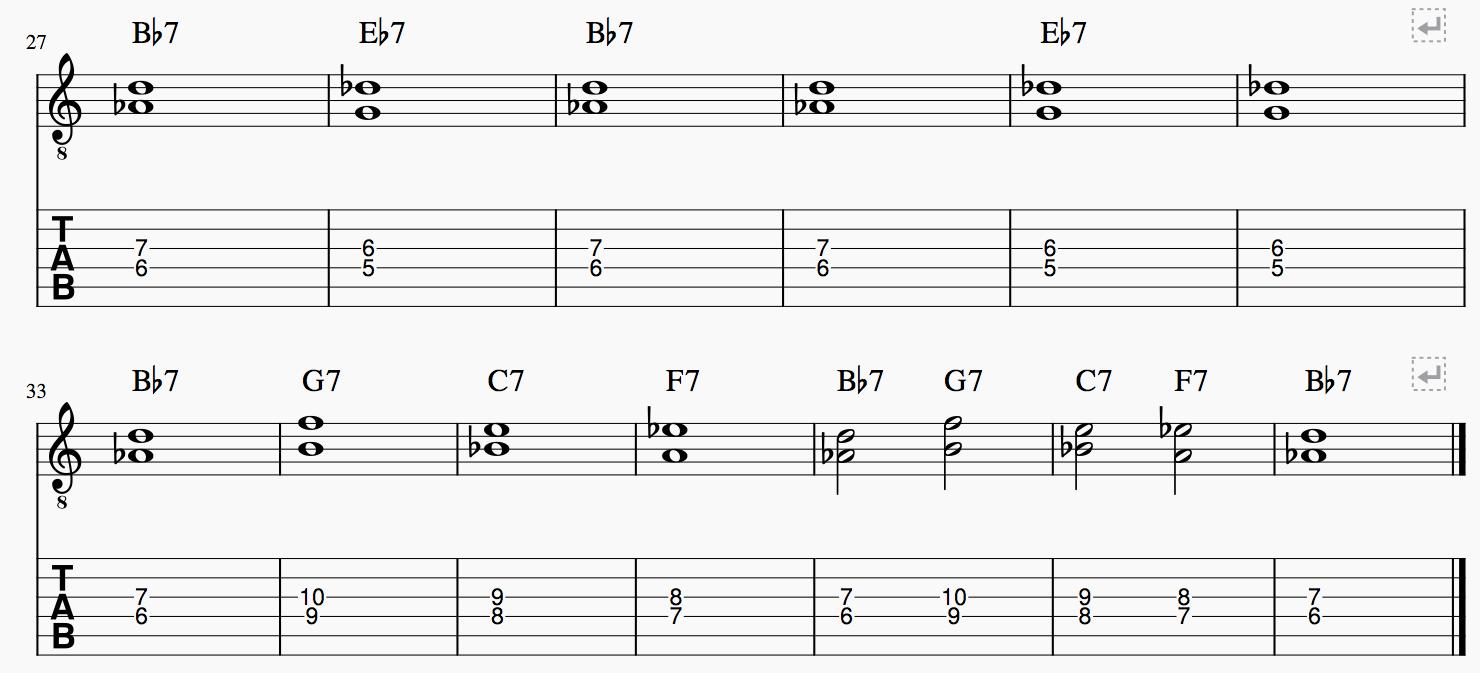
As you play through this example, be sure to keep visualizing the root note of each chord on the 5th and 6th strings! This will do wonders for your fretboard knowledge.
Let the FUN Begin!
Okay, so what now?
Well, now that we have freed up our fingers a little bit, we can add extensions above the essential tones. You hear Ed Bickert do this all the time, and it adds a really nice melodic element to his comping.
There is a simple "scale" pattern that you can play above the essential tone shape here to access all of the typical dominant extensions. It looks like this:
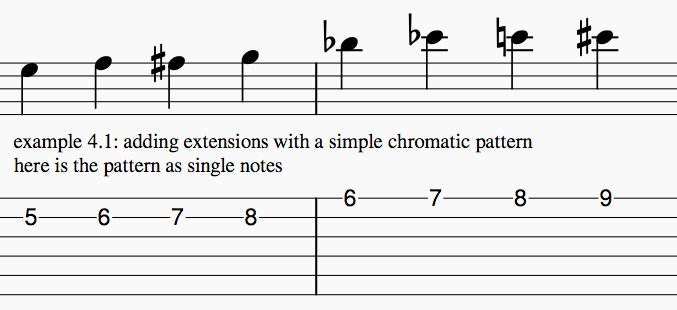
If we add that above our Bb7 essential tones, here's what we get:
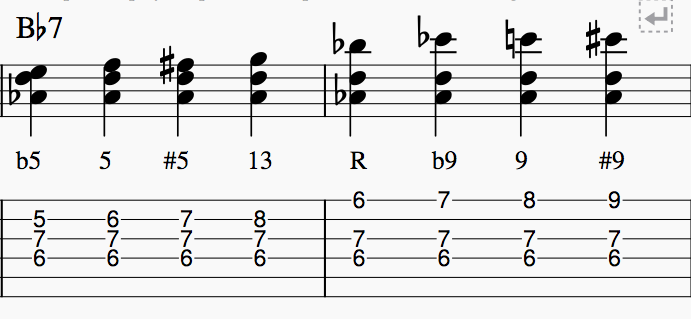
Try playing them broken as well:

This pattern will work for all of the essential tone shapes we played before. However, for the chords with the root on the fifth string (like Eb7, G7 and F7), the extensions get moved around:

Compared to the Bb7 extensions, the extensions for Eb7 have sort of "swapped strings." Did you notice?
For the Eb7, the 5th and 13th extensions are on now found on the 1st string, while the 9th extensions and root are on the 2nd string.
However, try not to get too caught up in the theory if it's not making sense right away - the real goal here is only to add a melodic element to our comping.
Putting It All Together
Now that we know where the extensions are, we can use them when comping over the blues. Let's start by adding one note extension to each chord:
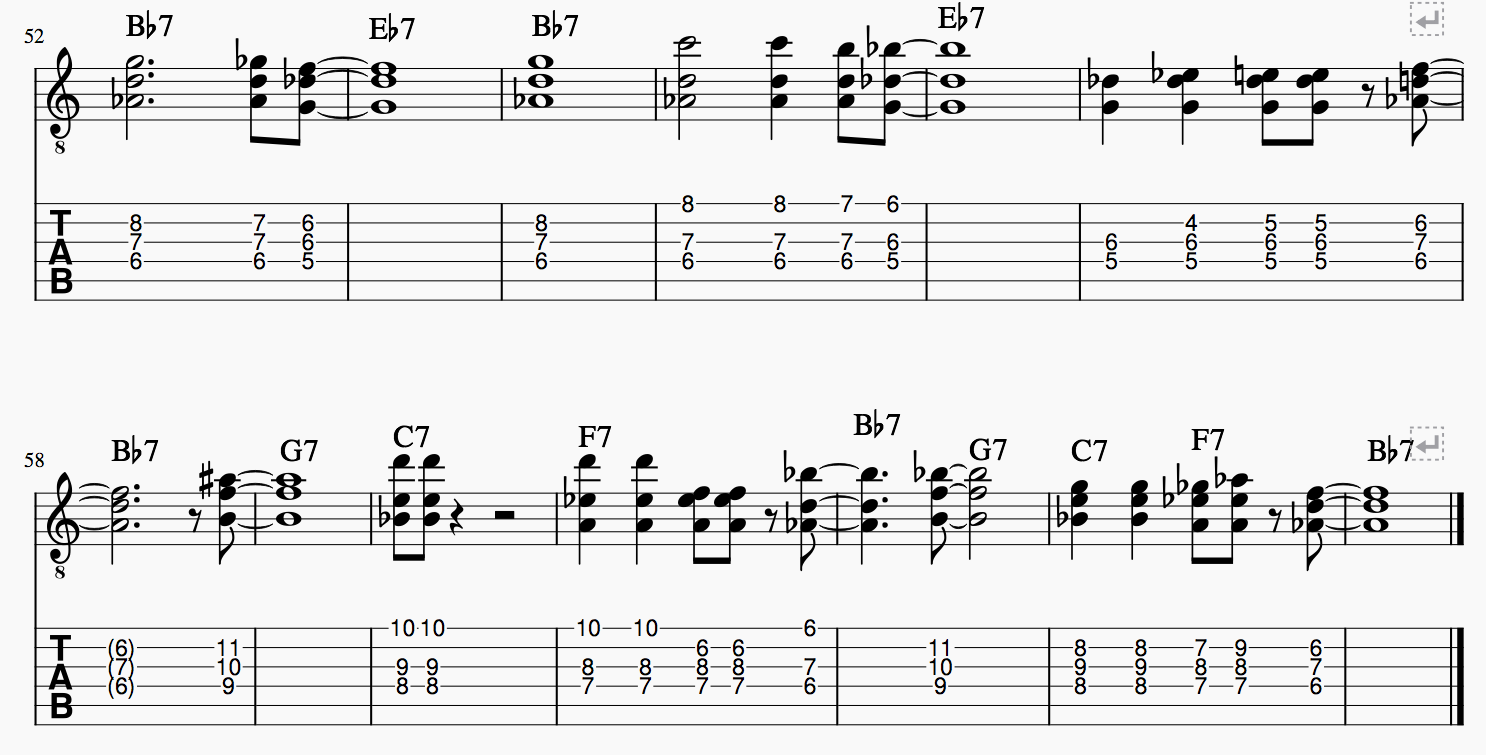
You can download the sheet music for the example below. Probably easier to see than on tiny screen! :)
Now for our final example, let's take it one step further and have two extensions on every chord.
What I've done here is add one more note to each chord in example 5:
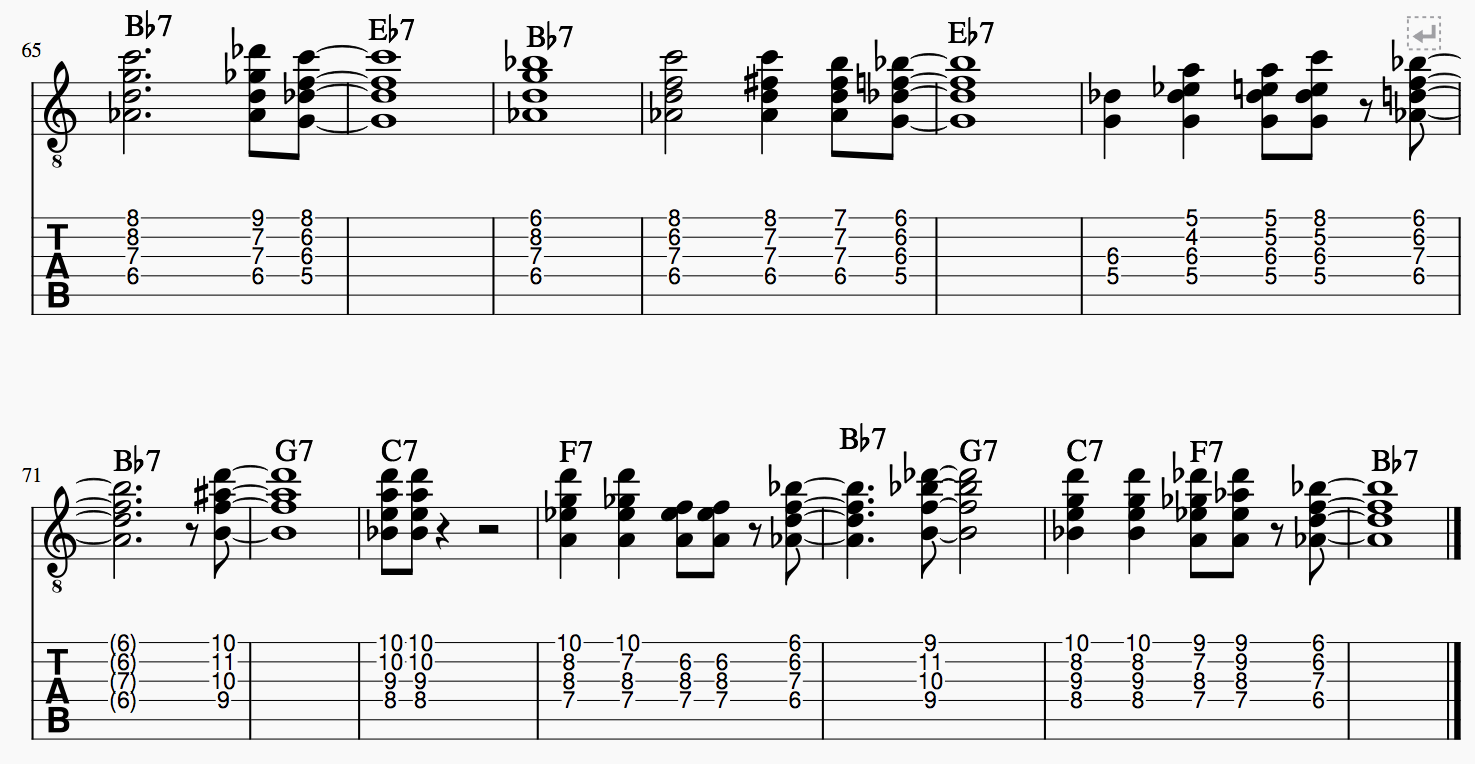
Download your "Improve Your Comping with Essential Tones"
Join our Community here.
Final Thoughts
And that's it for our lesson today!
One little bit of homework: see if you can go through the last two examples (5 and 6), and clearly identify the 9ths, 13th and so on. We've purposely labelled the chords simply Bb7 and Eb7 (with no extensions in the chord symbols) to let you do some of the work ;)
Once the concepts here are starting to sink in, try playing your own improvised comping over the blues, either with only essential tones, or essential tones plus a few extensions. You can even use this stuff to create entire chord solos! Keep it swinging.
And once you really get the essential tones (shells) into your ears and fingers, see if you can apply them to minor 7 chords, major 7 chords and more intricate jazz standards chord progressions.
Until next time, I'm Nathan from JazzGuitarLessons.net - thanks for reading and plucking along.
👍
A Guest Post by Nathan Corr
Nathan Corr graduated with distinction at Carleton University (Ottawa) studying under Tim Bedner and Roddy Ellias. In order to continue to hone his craft, he moved to Toronto in 2015. Nathan performs, writes, and arranges jazz standards, originals, and video game music. He currently teaches and performs in Toronto, Canada.


